Layout
Managing Layers
Swift Publisher has a layer-based workflow to help you manage complicated designs by keeping your canvas uncluttered. Layers are commonly used to isolate text, illustrations, background and other design elements. As a rule, one layer is dedicated to text, and another to the images and background elements. A new document has two layers (foreground and background). You can add as many layers as needed.
Each layer is present on all of the pages of your document, including master pages. Modifying the visibility of a layer or making it non-printable affects the objects of this layer throughout your entire project. So let's say you want to print a draft copy of your document for text proofing. You can make layers containing background images non-printable in order to print only text.
You can manage layers using either Arrange > Layers in the menu or the Layers panel at the bottom of the Inspector. To open the list of layers, select View > Inspector > Layers.
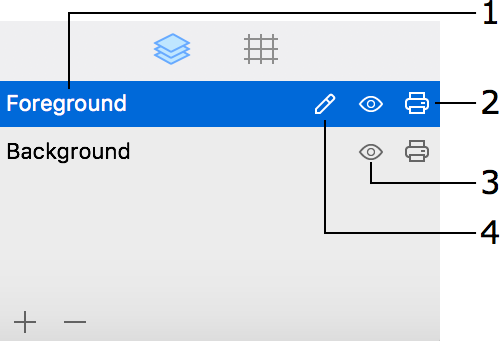
1 – The name of the active layer is highlighted. To activate another layer, click on its name.
2 – The Printable property. Objects on non-printable layers are visible, but aren't printed or exported.
3 – The Visible property. The objects on invisible layers are invisible. They aren't printed or exported. You cannot edit an invisible layer.
4 – Click on the pencil icon to rename a layer. You should activate a layer to rename it.
Activating a Layer
You can edit only those objects that are located on the active layer.
To activate a layer, select its name in the Arrange > Layers menu or in the pop-up menu. Alternatively, you can click on the layer name in the Inspector.
Creating Layers
To create a new layer, choose Add Layer in the Arrange > Layers menu or in the pop-up menu. Another way to add a layer is to click the plus button below the list of layers.
Removing Layers
To delete the active layer, choose Remove Layer in the Arrange > Layers menu or in the pop-up menu. Another way to delete a layer is to click the minus button below the list of layers.
It is not possible to delete the last layer because at least one layer must be present in the document.
Note that together with the layer, you delete all of the objects of this layer on all pages.
Making a Layer as Nonprinting
To make a layer non-printable, uncheck Printable in the Arrange > Layers menu or click on the Printable icon in the pop-up menu.
To make a layer printable, do the opposite.
Making a Layer as Invisible
To set a layer as invisible, uncheck Visible in the Arrange > Layers menu or click on the Visible icon in the pop-up menu.
To make a layer visible, do the opposite.
You cannot modify an invisible layer until you make it visible.
Rearranging Layers in the Layer Stack
To change the position of a layer in the layer stack, open the Layers panel in the Inspector and drag the layer name to a new position. To make a layer the frontmost, drag it to the top of the list. To make the layer the bottommost, drag it to the bottom.