Importing
Importing from iTunes and Photos
When designing discs or other documents related to them, you cam import a list of audio tracks from iTunes, as well as a list of photos from Photos. This comes in super handy when creating a music compilation or backing up your photos.
To open the Import dialog and start importing, select Insert > Media Tracks… from the main menu.
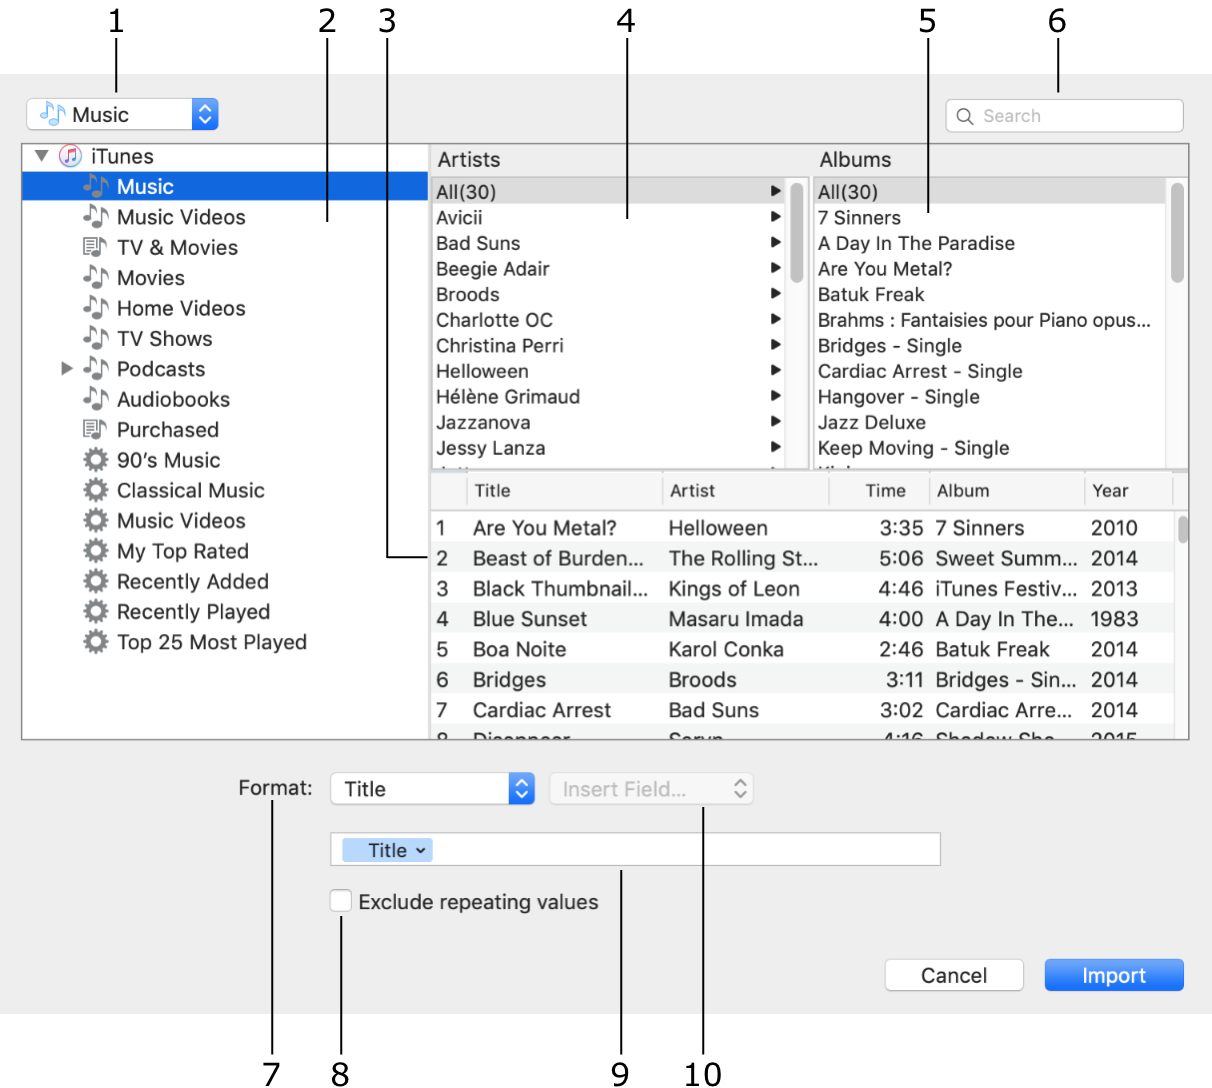
1 – Here you can select either your iTunes or Photos library.
2 – In this list, you can choose to browse either a playlist or the whole library.
3 – List of tracks related to the selected artist and album.
4 – List of artists.
5 – List of albums.
6 – Search tool.
7 – List of formats. Formats work as patterns and let you filter the imported data in order to choose which information should be displayed (title, artist, duration, etc.). By choosing a particular format, you arrange the information in columns or in a line. You can use standard formats, or create a custom one.
8 – An option to exclude repeating information. It can be useful, for instance, if you want to create a list of all artists on the disc. If the checkbox is selected, any artist that has more than one song on the disc will only show up once in the artist list.
9 – This edit box displays the structure of the currently selected format. You can customize it by adding or removing new elements. To add a data field, choose it from the Insert Field… list. To add a symbol, such as a minus or bracket, type it. Place the cursor in the edit box where the element you want to add should appear.
10 – List of data fields and separators to create custom formats.
Importing from iTunes
- Select Insert > Media Tracks… from the main menu to open the Import dialog.
- Select iTunes as the data source.
- Select a playlist or the whole music library in the left box.
- Select an artist and album.
- Select the tracks included on your disc.
- Select the format of the imported textual information.
- Click on the Import button.
The imported information appears in your document inside a regular text box. Thus you can use the text formatting tools. If the imported data is organized in columns, you can change their width using the tab stops feature.
Importing from Photos
- Select Insert > Media Tracks… from the main menu to open the Import dialog.
- Select Photos as the data source.
- Select an album or event in your photo collection.
- Select one or several images.
- Select the format of the imported textual information.
- Click on the Import button.
The imported information appears in your document inside a regular text box. Thus you can use the text formatting tools.
To import actual images from Photos for use in your design, use the middle tab in the Source panel.
Custom Format
An example of creating a custom format identical to a standard one: #. Title (Time).
- Clear the edit box. To do this, activate it, and press Cmd-A to select all of the elements. Then hit the Delete key.
- From the Insert Field… menu add the Number field.
- Using the keyboard, add a period.
- Add the Tab, Title, and Tab fields from the menu.
- Add a left bracket using the keyboard.
- Add the Time field.
- Add a right bracket.
- Add Line Break from the menu.
The program saves the custom format so that you can use it later again.