
Selecting and Arranging Objects
The Geometry Panel
The Geometry panel lets you adjust an object's size and coordinates, and change its other properties. To open the panel, tap the corresponding icon in the main window.
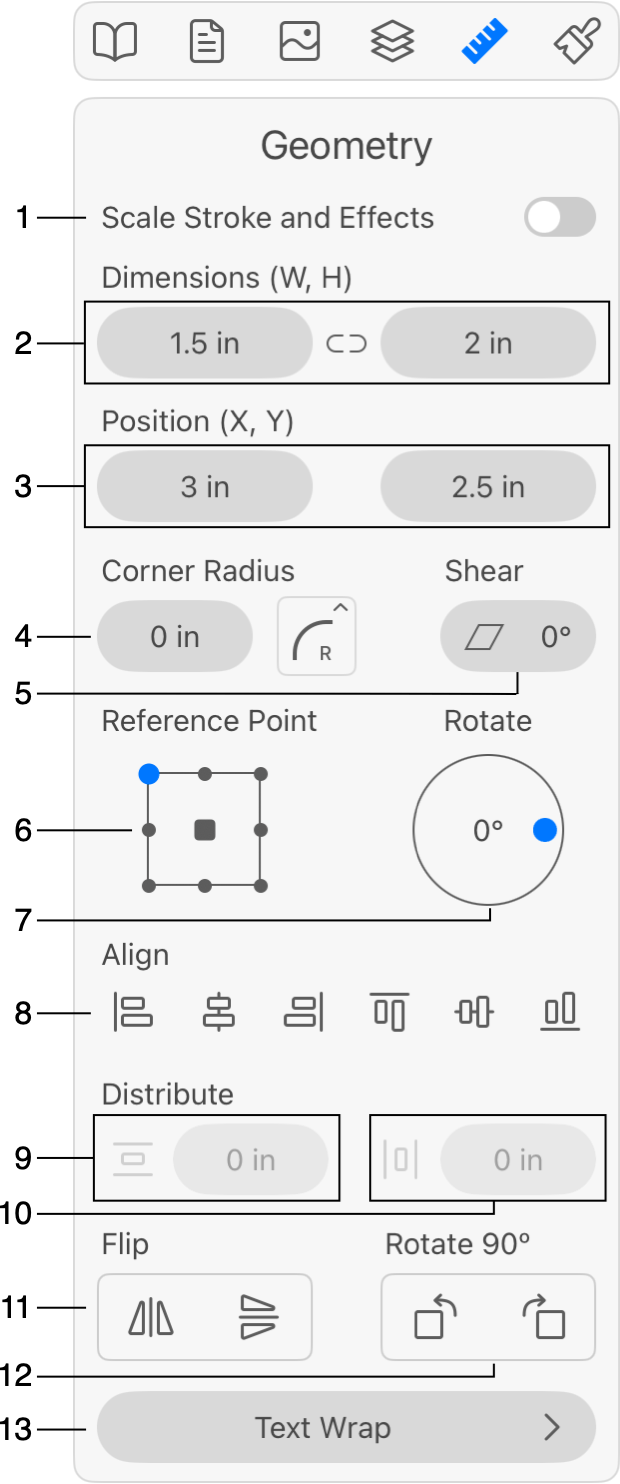
1 - Scale stroke and other effects when the object is resized. For example, making an object twice as big, you can expect that its stroke and shadow will be two times wider.
2 - The object's width and height. The Maintain Aspect Ratio option can prevent an object's deformation when you change one of its dimensions. The Maintain Aspect Ratio icon is located between the width and height controls.
3 - The object's coordinates.
4 - Corner Radius of shapes and paths. The popup menu on the right lets you change the shape of the corner.
5 - The Shear tool.
6 - Reference point selector. The coordinate defined by X and Y is the location of the reference point. The 9-point selector lets you choose a corner, the middle of any side or the center. With the same coordinates but different reference points, an object will have different locations. The reference point also defines the center of rotation for the Rotate tool.
7 - The Rotate tool. You can either input the angle into the text field or rotate the circular control.
8 - Align sides or centers of selected objects horizontally or vertically. When two or more objects are selected, this tool aligns objects to one of them. If only one object is selected, it will be aligned to the sides or center of the page.
9 - Set equal spaces between selected objects vertically. At least three objects must be selected. If you just tap the button, the distances between centers of objects will be made equal. If you enter a value and tap the button, the distances between sides (frames) of the objects will become equal.
10 - Set equal spaces between selected objects horizontally. At least three objects must be selected. This tool works similar to vertical distribution.
11 - Flip horizontally or vertically.
12 - Rotate an object 90 degrees left or right.
13 - Text wrapping options let you set up how an object interacts with lines of text.
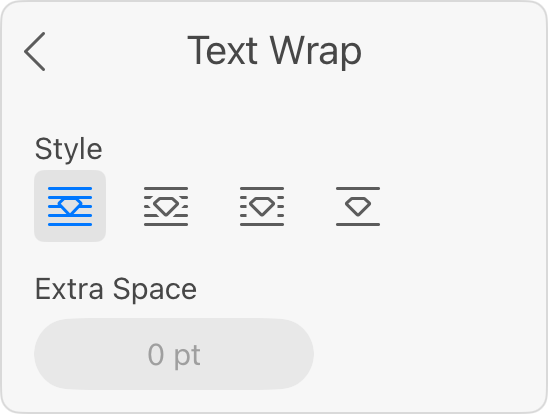
Lines of text can wrap around an object that is placed atop of a text box. To make that happen, select a text wrapping Style. The left button turns wrapping off. The other three options define whether text begins/ends at the object outline, object frame or the text is forced out by the object. The Extra Space lets you set up the distance between the object and text.
Move and Rotate an Object with the Geometry Panel
To move an object to a new location, change its X, Y or both coordinates. Notice that, by default, the X and Y coordinates define the location of the top left corner of the object's boundary. You can choose one of nine points using the Reference Point selector.
The Align buttons let you move an object to the center or edges of the current page. Normally, these commands require that you select several objects that should be aligned. If you select one object, it will align to the page.
In order to resize an object, change its dimensions. Use the Maintain Aspect Ratio button to preserve the object's aspect ratio while you are modifying either the width or height.
To rotate an object, input a new value by tapping on the angle field, or simply drag the handle on the circular rotation tool.
In order to rotate an object with 90 degree steps to the left or right, tap the corresponding bent arrow icon.
Apart from rotation, you can also mirror objects using the vertical and horizontal flip buttons.