Bleeds in Desktop Publishing
Let’s analyze frequently asked questions about bleeds and crop marks for printing and find answers to them together.
What Is a Bleed in Printing?
The definition of a bleed is an extra area that will be cut off from the final image trim. The main purpose of adding this additional space is to make expectations meet reality and avoid unnecessary white space in the final layout.
As it is Mission Impossible to print the required information precisely right up to the edge with the help of your home printing equipment, the same goes for professional printers. To avoid any inconveniences, it is highly recommended to adjust your layout body beforehand, making it ready-made for printing after the design work is complete.
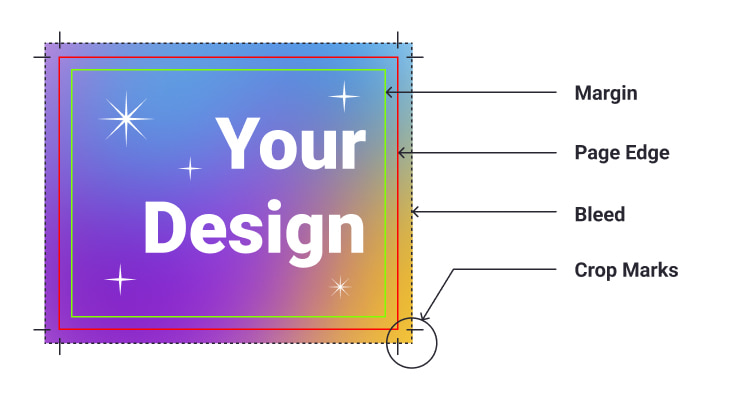
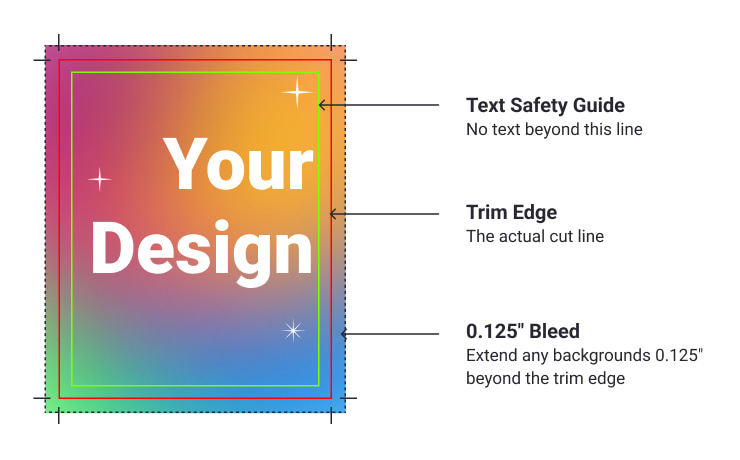
Usually, the overall size for bleeds is a frame of ⅛ inch or 3 millimeters. Setting the right bleeds is frequently confused with other auxiliary terms in the field. It is time to resolve any ambiguity so you can choose accurate solutions for your projects:
- Trim line—it is that precise end of the document you will achieve after all the modifications and cuts are done.
- Safety—in the majority of cases, it is the same size as the bleed, but its purpose is different. Unlike bleed marks on PDFs or other file formats, this inner margin is a safe area to definitely keep inside the project after the cut-off procedure is done. Caution is the parent of safety, you know.
- Borders—this is the space from the trim line to the paper edge. In terms of size, it is commonly around ¼ inch or 6 millimeters, but it can vary depending on your objectives.
Are Bleeds Important?
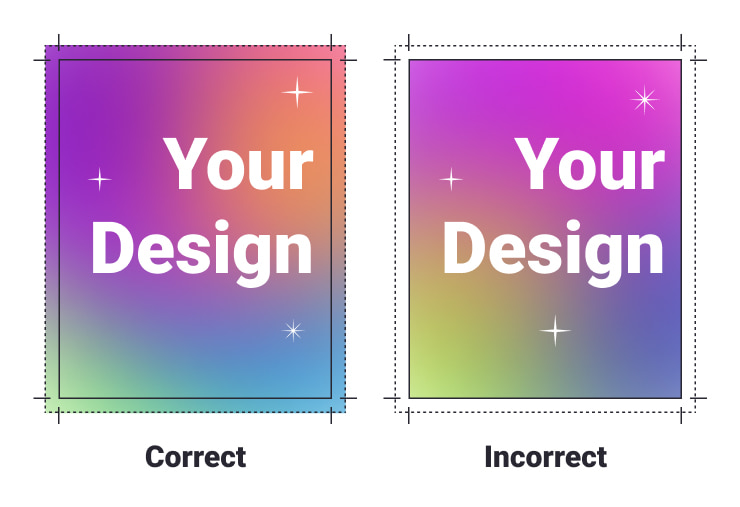
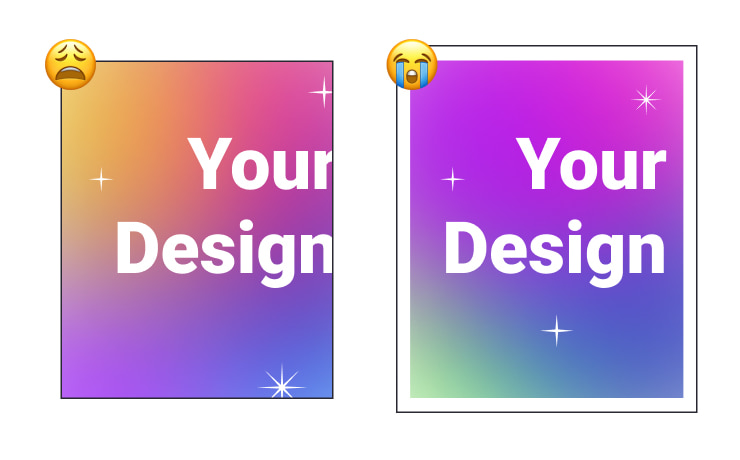
You will immediately understand the crucial importance of bleeds after the first printing when they are set incorrectly. There are multiple comparisons of projects printed out with and without bleed marks. If you create the project with important details right up to the edge, they will simply be cut off.
Leaving too small of a border can lead to unpleasant results, including improper dimensions of the printed materials. There may be several deficiencies in the way the information is located and visible on the paper sheet itself. From this perspective, bleeds play a critical role in modern artwork design, especially when you are going to publish large volumes of documents.
How Much Bleed Space Do You Need for Printing?
Trying to define the right bleed size, you need to take into account the project specifications. If it is a plain background, it can be easily extended to the bleed zone as well. However, in cases in which some crucial information is mentioned close to the edge, it is better to err on the side of caution.
Since the recommended minimum is ⅛ inch or 3 millimeters per side, the overall document size with bleeds will be as follows:
- A standard flyer size with bleed marks will be 8.75″ × 11.25″.
- The dimensions of a pocket folder are going to be 9.25″ × 12.25″.
- A common poster size with printer marks will be 18.25″ × 24.25″.
As you know, the calculation principle is as simple as ABC. For those who prefer the metric system, there are analogous alternative measurements.
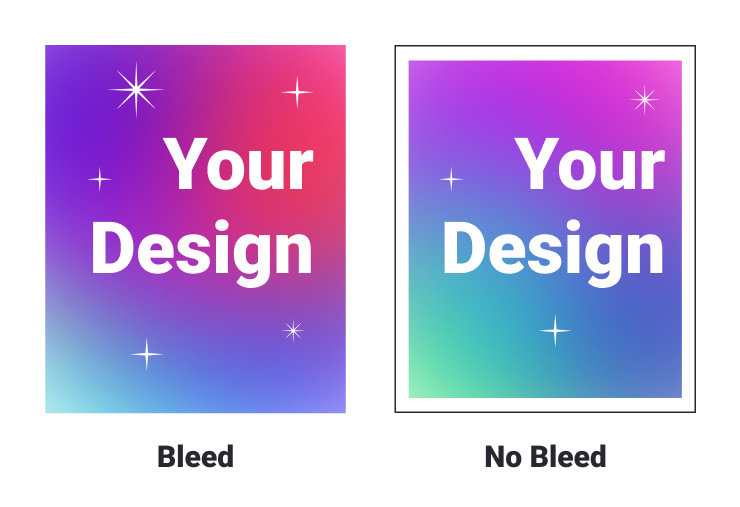
What Is Bleed or No Bleed in Printing?
The difference between these two notions is simple. The printed layout with a so-called white frame is one that comes without bleeds. On the contrary, full-bleed printing refers to the correct finished size that is colored up to the edge, and the size of the design body isn’t manipulated.
The most cost-effective way to proceed with full-bleed printing is to adjust your file prior to any design manipulation. By doing so, they will look more exquisite and high end, compared to alternative versions. Here are some rules of thumb to consider to make this feature work to the full extent:
- The purpose is important—no matter how efficient this feature may seem, it is not mandatory to add it to each and every file format you are using. However, keep in mind that it will seriously influence the way the final product looks. For small postcards, for instance, this small difference isn’t that crucial, especially given solutions with white backgrounds. With no-bleed printing, you will be able to save some funds. For larger documents, including tabloid posters, full bleed printing is obviously the preferred choice.
- Keep it precise—if you decide to add bleeds to your working files, don’t forget to set up the required minimum—⅛ inch or 3 millimeters. Please note these settings may differ from equipment to equipment.
- Determine the size you need—although there are standard sizes for divergent project formats, there are several customized ones. Before setting any type of bleeds, please ensure you will receive satisfactorily finished dimensions after unnecessary parts are cut off.
What Are Crop Marks?
Simply put, crop marks are additional guidance for printers to ensure the cutting-off process will be done accurately. Also known as trim marks, these are tiny lines used for commercial printing materials and located in the corners of printed files with bleeds. They are pretty helpful when it comes to documents with colorful backgrounds that extend right up to the edge line. When professional agencies proceed with trimming operations to achieve the final size, they use such marks as hints on where the cutting line within an oversized sheet of paper should lie.