Preparing Your Document for a Print Shop (using Swift Publisher)
If you decided to print your documents in a print shop, you'll probably find helpful to get some tips on how to prepare the correct design, and which format to use to meet the print shop requirements. Below you can find these requirements and tips.
Document Design Requirements
Resolution
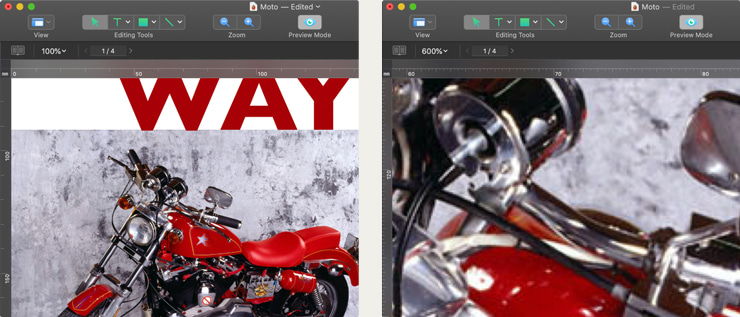
You may want to use photos and images obtained from a digital camera, scanner or from the Internet. Resolution is crucial for high quality of the printed picture. A picture that looks all right on the screen, may have jagged edges and appear fuzzy when printed. So, your image must be at a resolution of at least 300 dpi. To check whether your image has enough resolution, zoom in on your document until 600%. If the image looks acceptable, it will look fine when printed.
If you still decided to use a low-resolution image, resize it in Swift Publisher to make it smaller—the print output quality will increase.
With Swift Publisher you get the collection of high quality images. When you use images from the Internet, make sure their quality is good enough for your work. Usually, resolution of such pictures is too low for commercial printing.

Colors
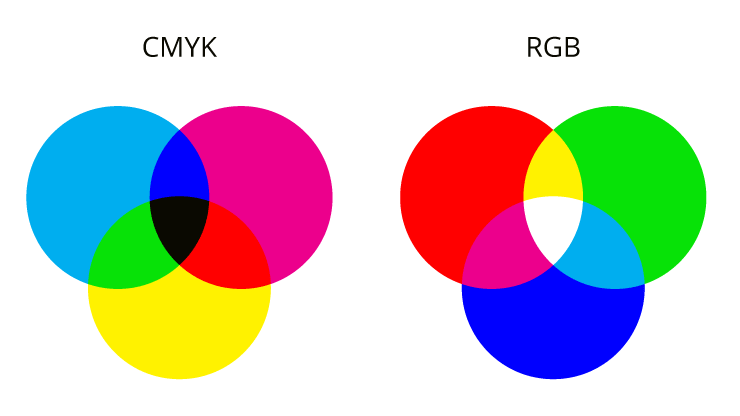
When you design your document, the colors you see on the screen are made up of the following three color components: red, green and blue (such color scheme is known as RGB). The monitor mixes these three colors to produce other colors. However, printers and other polygraphic equipment use another set of color components: Cyan, Magenta, Yellow and Black (this scheme is called “CMYK”). Consider this when designing your document—avoid using colors that are too bright, because the colors on paper may not always match those you see on the screen.
To get printed colors look like on your screen:
- The appropriate screen profile should be selected for your display.
- The original graphics, you are going to add into your document, should be converted to CMYK colors.
- Use the CMYK Sliders on the standard Colors for choosing colors for elements of your design.
Swift Publisher document can be converted to CMYK colors when you are exporting it to a TIFF or JPEG graphic file.

Preparing Your Materials for a Printing Company
File Formats
Before you carry / upload your work to a printing company, find out printing companies file format preference. Almost all print shops accept materials in the PDF and TIFF formats. Swift Publisher allows you to save your design in both these formats, with the required quality (the standard for high quality printing is 600 dpi resolution). Use the File / Export menu command for this.
JPEG file format is not recommended. It loses quality because of compression. Also JPEG images usually are not sharp.
PDF and Fonts
To display and print a PDF document correctly on another machine, all used fonts should be installed on it. Otherwise, the system will try to find replacement fonts. Such fonts may look differently than on your computer. To avoid this problem, two methods are commonly used. The first, the used fonts are embedded into the PDF document. The second, all text is converted to a vector image that looks exactly like your text (no quality loss when you scale it up). Note that both methods inflate the size of PDF document. In Swift Publisher, you can use the second method. For this, activate the Convert Text to Curves option in the PDF export settings.
Passing Your Materials to a Print Shop
Once you've designed your document, save it on the disk in the required format (the filename extension—PDF or TIFF—should not be omitted). Before sending the file, compress it to decrease its size. It's especially important if you submit your design via the Internet. Compress your files using the Aladdin's StuffIt to create a SIT file, or a Zip archiver (choose the File / Create Archive menu item in Finder).
There are several ways to deliver the prepared material to the print shop—ask your company which method is appropriate for them:
- Write your files to a CD, DVD, Zip or Jaz disk, and mail or carry the disk to the print shop. On your disk include only the file(s) you want to have printed.
- Upload the files via FTP (File Transfer Protocol). If your print shop supports this method, ask them for their FTP server name, login and password.
- Send your file(s) as an e-mail attachment. Many providers don't allow sending large attachments (over 2 MB), so make sure yours does, and your print shop accepts large attachments.
- On-line. Many print shops may have a file upload form on their web sites. Follow the instructions there.
Don't forget to consult your print shop for their preferred method.
Some More Tips
Text Background
To make flyers, brochures and other printed production more attractive, designers use background images. If you have such background images behind text, make sure, that the text is readable. Don't make background too dark behind the black text.
In Swift Publisher, you can adjust opacity of images or tint them so they are in contrast with text.
Check Spelling and Punctuation
Before you send your documents to a print shop check spelling and punctuation. Some text editors can do this for you. Don't let an unfortunate misprint bring your work to nothing.
Make a Hard Copy of Your Document
Before ordering thousands copies of your document, print one to see that all is done well. This will help you to avoid mistakes. May be you will see something what you miss on the screen.
Image Content
On the internet, there are multiple gorgeous images that will suit numerous project ideas. The key necessity to bear in mind is to search for stock or royalty-free photos. Otherwise, you can inadvertently print out someone else’s intellectual property without permission and spoil the results of your work. The divergence of sources makes a lot of modern image content designing techniques applicable:
- Interested parties can randomly come across specialized sites with the plethora of artwork on Google.
- You have to double-check whether the content you would like to apply won’t break the rules. For instance, the stock of Beltrami Studios or such well-known characters like Winnie the Pooh or Spongebob requires authorized licenses to work with.
- To get access to unique content, you can check image galleries of software for desktop publishing and their alternatives. Purchasing illustrations is a good idea on third-party platforms, including DepositPhotos.
What Printing Tools Are Best for Photos?
Regardless of what your final objectives are, it is crucial to ensure the quality of your project won’t be ruined by poor or inappropriate equipment. If you would like to prepare photo flyers for your business affairs or design an illustration collage at home, you will need to pay attention to the suitability of paper types and printers for your purposes.
If you want to get the most out of your hardware, giving your preference to branded options won’t be disappointing. Even if they are more expensive than no-name goodies at inexpensive prices, this investment is going to be more productive in the long run. Canon, Epson and HP offer exclusive materials for printing photos, namely, both paper and target devices. The use of such matches eliminates numerous challenges. For instance, a good Epson printer and a pack of premium glossy paper result in smooth and efficient publishing of high-resolution art stock.
What Types of Paper Are Most Suitable for Printing Business Files?
Of course, a lot of nuances become clear after the project’s specifications and goals are identified. Let’s be more precise. If enthusiasts need their creations to last, a good choice is vinyl varietals. This material has a higher resistance to water and other environmental influences. The paper brightness and weight are also crucial parameters.
For those parties who need to increase the readability and eye-catching powers of their project, glossy materials will be brighter and, therefore, more suitable. If you need to preserve a professional finish and level it up for more personalized users (business cards, for instance), thick matte paper would be an ideal choice.
Companies can freely choose non-premium paper types for printing faxes and emails. The standard lightweight options that are around 90 g/m2 are applicable. For more lasting and noticeable influences, the increase in thickness is a must. Mid-weight types are excellent for two-sided printed materials, while the next selection of paper is the right consideration for branding presentations.