Preparing Your Business Card for a Print Shop
If you decided to print your business cards in a print shop, you’ll probably like to get some tips on how to prepare the correct design, and which format to use to meet the print shop requirements. Below you can find these requirements and tips.
Card Design Requirements
Text and Graphics
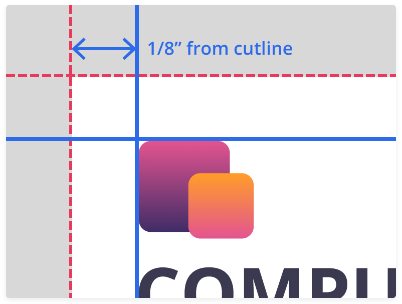
When you design your card, make sure that artwork and text are positioned at least ⅛ inch away from the edges of the card. Otherwise a part of your text or logo may get trimmed when cards are cut.
Bleeds
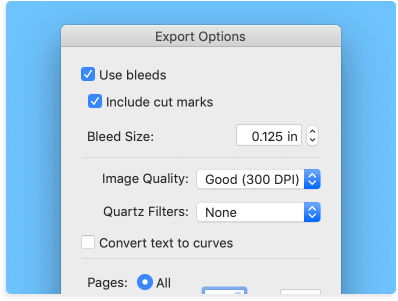
Most printing companies require the original artwork file to include bleeds. Bleed is a border surrounding the card which will be trimmed off during the cutting process. So, when you export your design to PDF in Swift Publisher, set the ⅛″ (0.125 in) bleed around the edges of the card–click the Options button in the Export dialog. Note, that bleed size requirements may be different in each specific print shop.
Backgrounds and Borders
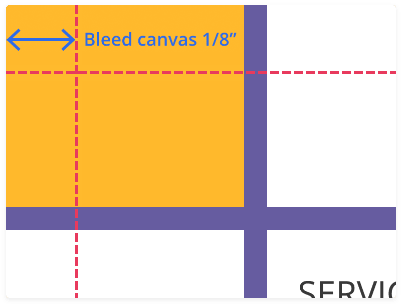
If you use a custom background or border in your card, it must go over the edges of the card slightly, otherwise clear area might result on the edges of the printed card. It’s not necessary if you’re using one of the backgrounds that come with Swift Publisher, as the program will add the necessary bleed when the file is saved to PDF.
Resolution
You may want to use photos and images obtained from a digital camera, scanner or from the Internet. For images, resolution is crucial for good quality of the printed picture. A picture that looks all right on the screen, may have jagged edges and appear fuzzy when printed. So your image must be at a resolution of at least 300 dpi. To check whether your image has enough resolution, zoom in on your document until 600%. If the image looks acceptable, it will look fine when printed.
If you still decided to use a low-resolution image, resize it in Swift Publisher to make it smaller—the print output quality will increase.
Colors
When you design your card, the colors you see on the screen are made up of the following three color components: red, green and blue (such color scheme is known as RGB). The monitor mixes these three colors to produce other colors. However, printers and other polygraphic equipment use another set of color components: Cyan (blue), Magenta (red), Yellow and Black (this scheme is called “CMYK”). Consider this when designing your card—avoid using too bright colors, because the colors on paper may not always match those you see on the screen.
Preparing Your Materials for a Printing Company
File Formats Supported by Printing Companies
Before you carry / upload your business card design to a printing company, find out their file format preference. Almost all print shops accept materials in the PDF and TIFF formats. Swift Publisher allows you to save your card in both these formats, with the required quality (the standard for high quality printing is 600 dpi resolution).
PDF and Fonts
When you export your business card to PDF, all fonts are embedded automatically. Nevertheless, they may sometimes display incorrectly in the print shop (depending on the software and equipment they use). If you wish to insure yourself against such problem, save your card to the TIFF format. The quality will remain the same, and the text will look exactly as you want it to. Even better if you bring the material in both PDF and TIFF formats, and let the printing company choose which one works best for them.
Passing Your Materials to a Print Shop
Once you’ve designed your business card, save it on the disk in the required format (the filename extension—PDF or TIFF—should not be omitted). Before sending the file, compress it to decrease its size. It’s especially important if you submit your design via the Internet. Compress your files using the Aladdin’s StuffIt to create a SIT file, or a Zip archiver (in Mac OS X 10.3 Panther you can compress a file to ZIP using the Create Archive context menu command, or the File > Create Archive menu in Finder).
There are several ways to deliver the prepared material to the print shop—ask your company which method is appropriate for them:
- Write your files to a CD, DVD, Zip or Jaz disk, and mail or carry the disk to the print shop. On your disk include only the file(s) you want to have printed.
- Upload the files via FTP (File Transfer Protocol). If your print shop supports this method, ask them for their FTP server name, login and password.
- Send your file(s) as an e-mail attachment. Many providers don’t allow sending large attachments (over 2 MB), so make sure yours does, and your print shop accepts large attachments.
- On-line. Many print shops may have a file upload form on their web sites. Follow the instructions there.
Don’t forget to consult your print shop for their preferred method.